I started bookbinding as a hobby more than 40 years ago. I took evening classes at Leicester Polytechnic (which had recently taken over the Leicester School of Printing, along with its specialist bookbinding staff) in 1976 and continued for five years. Trevor Hickman was the tutor – sadly he died a couple of years ago – very highly respected by all his students. Over the next 25 years I gradually acquired all the tools, equipment and materials necessary to tackle any repair or new binding job, and I joined the UK-based Designer Bookbinders, and later the Society of Bookbinders. Their weekend courses and conferences were important to developing my skills. Initially I bound or repaired just my own books, but people began to ask me to do repairs at which , with practice, I became quite proficient. When I retired from full-time work I took on more repair work and now, fifteen years later, my work book has over 2000 entries, including some new bindings for clients. Now I would like to share some of the techniques and methods I have developed with other binders, however new they may be to the craft, and that is the chief aim of this Blog.
A recent job on a large folio printed in 1692 required a complete new binding:
The classic sprinkled panel design includes a repeated double-line fillet and a foliage roll.
Getting the corners neat and sharp is difficult, but there is an old trick for achieving a sharp square or mitred join at the corners:
Tape an old double-edge razor blade either at the end of the double line or across the corner of a mitre and the impression of the fillet or roll will end exactly at the edge of the blade.
Simple!
A Catalogue of Treasures – part II
Having settled on a design the first step was to block the title on the front cover. I am fortunate to have an old Mackay blocking press, acquired at the auction of the contents of the bindery of a retiring bookbinder in Hereford more than 20 years ago. Not only does it have a large ‘chase’ (the frame in which letters or blocks are held for impressing on leather or cloth covers) but the ‘head’ can be raised or lowered to accommodate a variety of thicknesses of book.
I have some 36-point Times Roman brass type which fills the width of the design nicely so with that stamped through gold foil the rest of the design can be set out:
starting with the curved lines. The position of each is marked with the point of a bone folder through the paper design. The complete shape looks pretty good. Then the small tools can be added before the important flower head tooling.
But that presented a problem as the chosen tool was too detailed to make a clear impression on grainy morocco leather:
A possible alternative tool, bottom left of the picture above, is just too wide to fit in to the framework of curved lines. So the best available tool was used – one has to be prepared to adapt designs in the light of both the tools available and the characteristics of the materials used. Another adaptation was to leave out the short straight lines around the edge of the design – I decided they just were not necessary. So the final result is this:
And it goes on the shelf next to the Cobden-Sanderson binding shown in the first part.
First, I’m sorry it has been more than a year since my last post. Some medical things, not unconnected with my age (now 83), have taken up a fair bit of time. Now all resolved.
But I wasn’t sure of such a good outcome for a while so I focussed on clearing up a backlog of projects that have been tucked away in cupboards in the bindery – as mentioned in one of the earlier posts – in some cases for years. One such project is to put a worthy binding on one of my two copies of the Catalogue of the exhibition of treasures from Sir Paul Getty’s Wormsley Library that was mounted at the Pierpont Morgan Library in New York in 1999. The Wormsley Library is an astonishing flint and stone addition to the main house on the Getty Buckinghamshire estate, in the style of a medieval castle. It is not open to the public but I have been fortunate enough to visit it on several occasions over the past 20-odd years. The Pierpont Morgan Exhibition comprised 106 items chosen by Sir Paul himself, ranging from a sheet of vellum written out in the middle of the 7th century, probably in Northumberland, to a calligraphic manuscript of Under Milk Wood completed in 1978. Most of the books chosen are in exceptional bindings, which is why I treasure the catalogue myself.
I have a lot of catalogues of either auction sales or exhibitions and I have bound a few in the past, both to preserve and to dignify them.
This is one of my two copies of the famous 1958 Baltimore Museum of Art exhibition catalogue illustrating the history of bookbinding from 525 AD to 1950. The design is a rather obvious pastiche of French binding of the mid-16th century.
About 30 years ago I used a newly-acquired pair of medieval stamps to decorate a binding of the three Sotheby’s catalogues of their sales of the medieval manuscripts collected by C. W. Dyson Perrins, of Worcestershire sauce fame, that took place in 1958, 1959 and 1960. I rather over did it!
The boards are wooden and the edges sprinkled dark brown.
I have been interested in Cobden-Sanderson’s work for many years and acquired Miriam Tidcombe’s authoritative study of his bindings when it was published in 1984. About ten years ago I got round to re-binding it.
I had been lucky to find the flower tool in a job-lot bought at auction some 20 years ago and a bit of research proved that it was identical to one of Cobden-Sanderson’s own tools, both made by Knights and Cottrell around 1900. The long s-shape gouges are the same as used on the French renaissance-style binding above.
Another fine catalogue that was well worth binding properly is of the exhibition of illuminated manuscripts in Cambridge libraries put on at the Fitzwilliam Museum in 2005. In this case I bound it in oak boards with the spine and insides of the boards exposed. I have used this to demonstrate medieval binding techniques in a couple of illustrated talks.
But now for the Wormsley project: The text was in octavo sections which were carefully pulled from the adhesive flat spine and re-sewn on four tapes. The edges were ploughed and rounded and backed, then sprinkled in two colours and endbands sewn on, also two colours. The spaces between the tapes on the spine were filled with leather, pared at the side edges. That gives a very flexible spine, suitable for the rather heavy art paper pages to fall open easily.
Boards were made of two thicknesses of 2mm greyboard, each lined with paper and then cushioned all round. They will be attached by insetting the tapes on the inside of the boards which will be anchored firmly by the infill card after covering with the leather.
I have a nice piece of dark green morocco which will take gold tooling very well.
But first I need to work out a design. I think the Cobden-Sanderson design worked well, but I no longer have the flower tool that it was based on. But I have another, so this is the plan at present:
Today I finished rebinding a large early 18th century folio in full calf with the covers decorated in the Cambridge Panel style.
I rather like the fact that the book is entitled ‘Athenae Oxonienses’ (a compendium of authors who were members of Oxford University) and yet its original binding was in the so-called Cambridge Panel design.
Setting out the design is easy if you follow these steps:
measure the width of the cover from hinge to foredge,
divide that measure by 11
make the outer frame two-elevenths wide all round
make the inner frame also two-elevenths wide all round
the middle panel will then be three-elevenths wide.
These proportions will work for any size book. It is traditional for the middle panel panel to be quite heavily sprinkled with a dark dye, for the middle frame to be left clear and the outer frame to be lightly sprinkled.
The outer frame is exactly the size of the cover board and the inner frame and middle panel are cut out of it, according to the measurements set out above.
The sprinkling starts with all three pieces of card placed on the cover. The two middle ones are held in place with a weight and the outer frame removed. The spine is masked off with masking tape and the outer exposed frame is lightly sprinkled. The best sprinkling is with a good old-fashioned bristle nail brush: the brush is dipped in a shallow dish of spirit stain (not watercolour ink which I have found to fade quite quickly) and then most of the stain is tapped off on to waste paper. The brush is repeatedly struck gently across the edge of an old knife, towards the area to be covered and both brush and knife moved around steadily so as to give even coverage. Next replace the outer frame and remove the middle panel . This area should be sprinkled more heavily.
The blind tooling should be done with quite hot tools on dry calf, but if done on goat leather it should be lightly damped first.
The fillet lines and decorative roll look best on the un-sprinkled middle panel, except the lines around the outer edgeIt doesn’t matter that the double blind lines cross at the corner – they always did ‘back in the day’
Finally, a light treatment with wax polish.
A second binding, finished a few days ago has plain covers but a decorative spine. This was at the request of the owner so as to replicate what was there originally, now very much faded and decayed.
The corner and centre tools are not identical to the originals, but correctly echo the date of publication. Gold tooling on an old book always looks too bright, but I don’t like the idea of dulling it down with weak stain or ‘dirty’ paste.
Like most bookbinders, I get asked to repair books that I could never afford to own. But in this case I have been asked to repair a valuable book that I would never wish to own!
In the 1790s two London publishers, John and Josiah Boydell and George and W Nicol planned to produce a ‘magnificent national edition’ of Shakespeare’s plays in which ‘splendour of production was to go hand in hand with correctness of text’. The result was the nine large folio volumes known as the Boydell Shakespeare, issued in 1802. A full set is currently listed on a bookseller’s website at $19,000.
My customer owns a set but volume nine was damaged: the front board had come off and the back board was weak: can I repair it, please? Well, yes, of course – but it presented quite a challenge because the volume weighs 7.6 kg (nearly 17 lb.) and is 17 inches tall, 13 inches wide and nearly 3 inches thick. It had probably been dropped and that is why the cover had broken off.
After repair – old spine removed, book re-backed in matching calf, spine replaced
The challenge was to devise a method of attaching the loose front board which would give at least as much (preferably more) strength to the hinged joint as it had to begin with. Otherwise the board would come off again as soon as it was severely stressed, and such severe stress is always a risk with a book that is so heavy and cumbersome to handle. But first the spine leather has to be removed. I may have said elsewhere in these posts, do not try to lift just the leather – on a large book there will always be paper linings under the surface leather so insert your lifting knife into the linings. The result is an intact spine strip with layers of old paper underneath and these must be carefully removed as far as possible, otherwise you get an ugly step at the edge of the replaced spine when you put it back on to the re-backing leather.
It was clear from the broken joint that the boards were attached, as one would expect, by the hemp cords on which the sections had been sewn – five of them – evidently properly laced through holes in the board and flattened on the inside. But the cords had been sawn in to the text block, so as to give a flat back, in line with the taste of the time. There is no way to attach strong extensions to the broken ends of the cords. I have dealt with this basic issue in a previous post (A Better Treatment for the Unhinged, April 2019), but for a great lump of a book like this one I did not think that attaching the board to the new cloth hinge with glue would be sufficient, however firmly the cloth hinge was attached to the text block.
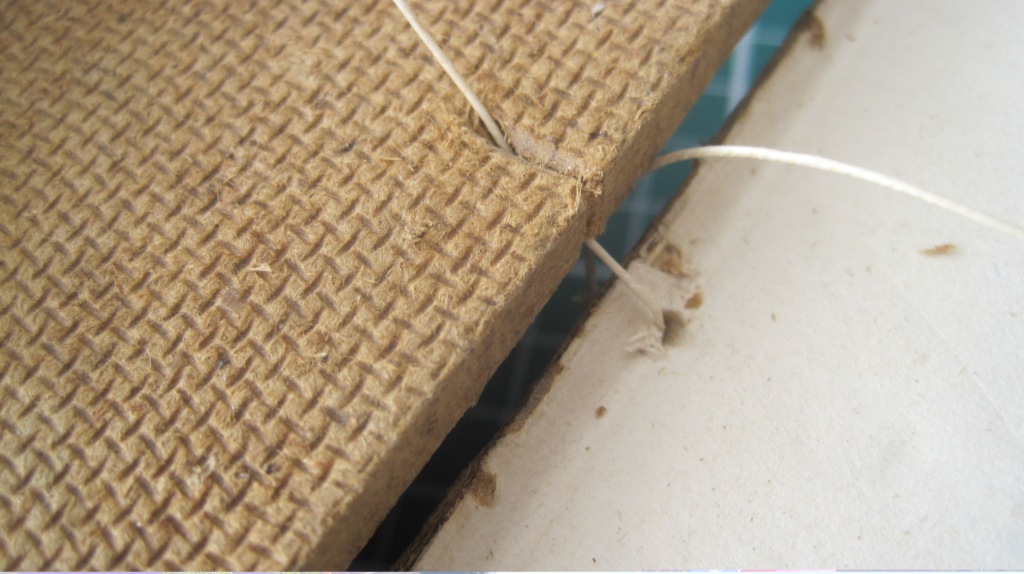
So I worked out a technique for physically attaching strong thread ‘cords’ both to the book block and the cover board. The following pictures show the method using a piece of hardboard to simulate the cover board and an old broken book in place of the actual one.
First, cut a notch in the upper edge of the detached board. This is to make it easier to position the drill bit to make the first holeDrill through the board at the angle shown. If the paste-down endleaf is very decorative, lift it out of the way before drilling, but in most cases it will be sufficient to cover the exit holes on the inside with a strip of repair tissue, coloured if needed.The hole should start at the base of the shoulder joint and exit on the back at an angle of 35 to 40 degrees.
It goes without saying – I hope!- that the holes in the board and the text block line up precisely. Of course, the strength of the attachment depends on the quality of the paper used in the text. In this case where the book was printed on Whatman’s best, and the drill hole passes through at least twenty leaves, I was confident that it would be strong enough. On the Boydell there are eight attachment points.
The inner and lower edges of the board should be notched so as to accommodate the thread ‘cords’. As was done to the wooden boards in medieval bindings.
The attachments are strong sewing thread, passed twice through the drilled holes in a figure-of-eight.
The third thread on the inner edge of the board has been brought round from the front after pulling both ends of the thread firmly to tighten the loops. The cut ends are then frayed out and pasted down on the inside of the board
When the cover is closed there is no visible thread on the upper surface of the board as both ‘turns’ entered at the edge, not on the surface. The threads in the tie will be flattened and glued down on the shoulder of the text, the free endpaper (previously removed, of course) replaced and the whole joint covered with a strip of repair tissue, rubbed down and coloured to match the endpapers.
In the course of working on the front board it became clear the the back board hinge, though still attached, was very weak. So the back board was removed and re-attached in exactly the same way.
Then the usual procedure of removing the remaining linings on the text block spine can proceed. In this case the animal glue used originally was very strong and took a lot of soaking with paste to soften it enough to scrape off. It is important in my view to get right down to the back of the sewn sections and then re-line with good quality paper. The old linings will almost certainly be degraded and brittle, even if the original glue is still effective, and there is no point in putting the re-backing leather down on to an unstable surface.
In this case, after cleaning all the linings off the back I used four thicknesses of strong (160gsm) Kraft paper. Then re-backing with calf dyed to match in the usual way.
In the end, I have stronger forearms that before – I must have lifted and turned the 17 lbs lump fifty times during the job.
‘The Poems of John Keats’ was regarded as the most popular of all Kelmscott Press books. Published in 1894 (300 copies on paper at thirty shillings each (nearly £200 at today’s prices) and ten on vellum at 7 guineas (£1400 today)) it was issued in a plain vellum binding with no decoration other than the title in gilt on the spine and dull green linen ties. A good copy of the paper version in the original vellum binding is currently on sale at about £8000.
The Nottingham Court Press facsimile is very well printed on paper of the right tone and weight, though it has a texture on one side of the sheet and is smooth on the other – not quite right. This is the opening spread of the completed binding.
It was frequently rebound, sometimes in extremely elaborate style. Sangorski and Sutcliffe bound several copies in their trademark ‘jewelled’ style.
The only facsimile edition that I am aware of was published by Nottingham Court Press in 1979. I bought two copies in unbound form at the time and a little later bound one set in half morocco with marbled paper sides. It looked quite handsome on my bookshelf. I sold it to a dealer three years ago and it is still on his website at £300. The other copy has been sitting, still in loose sections, on a shelf in my bindery.
So. it’s high time those loose sections are turned into a book. I have several skins of Moroccan goat vellum – actually directly from Morocco – bought from a trader here in Stroud a couple of years ago. They are quite small and pretty rough at the edges, but I did find a couple with clean areas large enough to cover the book – it is 230mm tall by 135mm wide and 40mm thick. The original vellum-bound copies were simply cut at the top, with foredge and tail uncut. No headbands, and the cut top edge neither gilt nor coloured.
First, sew the sections together. I used red thread just to personalise what will otherwise be a very plain binding. The text has red headings and side notes so it seemed in keeping. Three linen tapes, back lined with mull with further lining of Kraft paper. No endpapers, as the outer leaves of the first and last sections are used as the paste-downs.
Showing the cut top edge and uncut foredge
Incidentally, the plough I use has a circular blade which works much better than the normal chisel shape blade. I bought it at auction over ten years ago and have used it ever since. No maker’s name on it at all!
Early engravings of bookbinders’ workshops show ploughs with circular blades
The vellum binding is in fact a case, made off the book. First, I cut the spine stiffener/lining and glue it in the centre of the selected piece of vellum. This prepares it for blocking the title on the spine. You don’t want to block the title on the vellum first and glue the stiffener/lining afterwards as it would be extremely difficult to position it accurately. If you cut a couple of nicks at head and tail of the vellum piece, in line with one edge of the stiffener, you can position the cover accurately on the platen of the blocking press so the the title is stamped centrally and the right distance from the head.
The underside of the cover vellum with the stiffener strip in place and nicks to guide the placing of the cover face up for blocking the title. the creases are to help to position the thin boards later. Note the extra width of the foredge turn-ins to accommodate the yapp edges.
Next, cut the slots for the tape ties. As stated in an earlier post the slot positions are marked with small punched holes.
A screw punch (top of picture) is used and the slots cut with a scalpel between the holes
The tape ties are now threaded through the holes – just loose, no glue or paste.
Next, the head and tail turn-ins, but first the corners have to be cut so the yapp edges can be neatly formed.
Unless the vellum is quite thin and supple, it helps to sandpaper the corner area and the cut edges.
The boards are 1mm greyboard and are not glued or pasted to the vellum cover. This is the ‘drummed’ technique described in an earlier post. The boards are put in place and held there with a weight and the top and bottom turn-ins are glued down. Then the yapp foredges are formed by creasing the turn-ins against the edge of the greyboard and turning then up at 90 degrees. This creates sharp crease marks which are then lightly sanded on the inside to thin the vellum so that the actual gluing and shaping is easier. It also helps if you dampen the outside surface of the turn-ins.
The greyboard lining is on the right. After creasing the vellum against its edge the vellum is folded back and the crease lines sanded to make the final folding and gluing easier.
The foredges are then glued and shaped and allowed to set between weights.
That’s it – the case is made and simply attached to the book block in the normal way.
Offers over £8000 will receive immediate attention.
Following on from the last post, the title is to be placed in the panel across the top of the front cover. So, how best to do that with the resources available.
First, choice of method: I have a heated blocking press so I could set up type in the press, position the book accurately on the platen and do the job in one pull of the handle. But the word ‘accurately’ is the problem. The book is 50mm (two inches) thick and the upper cover is difficult to place and hold in a fixed position so that the type strikes in exactly the right place. Using a cast metal block of the selected lettering is easier. You put the book, face up, on the platen of the blocking press, place the block exactly where you want the impression to be on the cover, put a scrap of bonding tape on the back of the block, bring the heated chase down on to the block for a few seconds and then lift the chase back up. The block is now attached to the chase and will heat up to the correct temperature. DO NOT MOVE THE BOOK!! Place a strip of foil where the lettering will be and bring the chase back down . Because the book has not been moved the stamped title letters will be exactly where you placed the cold block in the first place.
But getting the block made takes a little time and would cost, in this case, at least £20. And the block-maker needs artwork which you will have to prepare from your own type, assuming you have a suitable face and size in stock. More time and trouble.
In any event, since the book is really a companion volume to the earlier ‘Bookbindings of T J Cobden-Sanderson’, a title in the same lettering would be best. So, I will use the same set of handled letters as on that book.
The letters are quite large and I have devised a method of tooling them through foil that has worked well in the past. The problem with lettering through foil is ‘sighting’ the tool so the impression is in the right place. As with gold leaf tooling, you make blind impressions first, initially with a light touch through the design on thin paper:
The light impressions are then sharpened up with very warm tools (but not hot).
When the whole line of letters is complete I tape a strip of foil all the way across, but covering only the lower half of the letters.
Because you can see the top of each letter clearly you can position each heated letter tool in exactly the right place.
You can more accurately place letters with a vertical left stroke if you turn the book 90 degrees. So sighting the ‘H’ against the ‘T’ and the ‘E’ against the ‘H’ is much easier.
Now, place the strip of foil to cover the upper half of the letters and tool again, sighting by using the gold impressions already made.
You just have to be careful that you hold each letter upside down!
Here is the result.
Not bad – the ‘O’ is too close to the ‘D’ and a little cleaning up of the outlines of the letters needed.
I will post a picture of the finished cover when I have completed the ‘dotting’ in all four corners.
Thirty years ago I bought a copy of ‘The Doves Bindery’, by Marianne Tidcombe, newly published by Oak Knoll Press and the British Library. A few copies were offered unbound, in sheets, at the same price (£90) and I bought one in that form. This book followed on from her earlier study of the work of T J Cobden-Sanderson (1984) a copy of which I also bought when it was published and, much later, bound in Cobden-Sanderson style.
The design is a version of a Cobden-Sanderson binding using a ‘Lily’ tool that I acquired on the net about ten years ago. It is stamped ‘Knights and Cotterell’ who made all of Cobden-Sanderson’s tools and is possibly from the Doves Bindery itself.
About 20 years ago I bound the Doves Bindery sheets using a skin of russet niger morocco with a very attractive grain. I sewed double headbands in dark green silk and sprinkled all edges. I made a box for it and there is has remained ever since.
So, thirty years after buying it and twenty years after binding it to the ‘forwarded’ stage, I think it’s time to finish it.
I initially based a design on the gilt decoration of the front cover on a nice example of Doves Bindery work that was offered for sale about a year ago.
By chance I have a ‘carnation’ tool that is identical with the tool used here. But I can’t match the other tools, so this is my version – as I have said before, you can only use the tools you have to hand, but I think the design below will work:
The title will be lettered by hand in the upper panel. The corner design will be filled in with dots and very small circlesThese are the tools required, along with a single line fillet wheel for the frame border
First, tool the frame border. My method is slow to set up but produces perfect results every time. I use real gold foil, not gold leaf and I run the fillet wheel against a straight-edge, with old razor blades at each end of each line. This ensures a sharp end point, with no risk of ‘run-over’.
The fillet must be run along the edge of the ruler in one movement – slow and with firm pressure because of the grain in the leather.
This is the result:
Next, start the corner decoration:
The position of each end of the ‘S’ tools is marked with dividers, taken from the design sheet. The piece of foil is held in place with a scrap of low-tack masking tape and one end of the hot tool is guided to the exact place with the thumbnail of the left hand – in my case the right hand as I am left-handed. Again the impression must be very firm because of the grain in the leather.
Next, fill in the corner spaces with the other tools.
Oh dear! the grain in the leather is too heavy for the detail in some of the selected tools, especially the carnation. A trial stamp produced a clumsy blurred impression.
Back to the drawing board! Two alternative treatments of the corners were devised using other suitable tools in my collection – suitable in terms of authenticity to the subject matter of the book.
The Doves Bindery often used an ‘open’ leaf tool like the one here, and the flower head is right for the period – early 20th century. But this, I think, is better. The ‘handed’ open leaf tools are exactly the same as ones used by Doves, as is the solid corner tool. The narrow open space is also found in several Doves bindings.
So that is the design I am using. The ‘open’ leaf tools make a clean impression in the heavy grain of the leather, as does the solid corner tool. The ‘dotted’ background is authentic, and helps mask the faint impressions of previous trial impressions.
Not perfect, I know, but an acceptable solution to a problem I created for myself by using the heavy grained leather in the first place! I will put in some more dots in the background so the open tools show up better.
Now for the three other corners and the title lettering……..
If you are wondering about the plain spine (the Cobden-Sanderson binding also has a plain spine), both books will be kept in drop-back boxes, so no spine treatment is actually needed. The boxes will of course have spine labels. Matching a design on a spine – tall and very narrow – to the cover design is a problem that Cobden-Sanderson, and his Doves staff did not often solve successfully, at least to my eyes.
With the braided clasps completed and attached, all that remained was to cover the spine, add title label and suitable decoration, and insert endpapers of the right colour.
I gave a lot of thought to the title on the spine. I had part of the original spine with the gilt-lettered title still intact so that enabled me to select a suitable typeface from my stock of brass type. But choosing how to do the lettering was difficult. You have to be very clear about your own levels of skill and of the tools and equipment available.
The choices were between:
1. Using individual handle letters, as had been done on both the Court Barn’s copy
Skilful (but not perfect) hand-lettering by the Guild of Handicraft bindery – probably Annie Power herself
and the Eyre & Spottiswoode’s copy
Still not perfect!
2. Using my gold-blocking press to stamp the title directly on to the whole piece of leather to be used for the spine
3. Make a label on a piece of the same leather as the rest of the spine using the blocking press
An alternative to hand lettering is using a typeholder. I have used one many times in the past, with varying success, but you only get one chance at positioning each line, both centrally and horizontally and I know the result will not be as sharp as from the blocking press. So that method is rejected.
Blocking directly on the the whole piece of leather which will cover the spine will give an initially sharp impression but then that leather has to be dampened and pasted and stretched in the covering process. There is a risk that the sharp blocked letters will lose both sharpness and brightness in that process. So that method is rejected also.
That leaves individual hand lettering or a blocked label. That choice was made a bit easier as I had a set of type exactly the right size, but only one set of handled letters that was nearly right, but not quite.
So, before covering the spine I pared a couple of pieces of the same skin very thin ( about 0.3mm) and backed them with repair tissue.
When carefully edge-pared and placed in the second spine panel between the raised bands a label of the same leather will be virtually (though not quite) invisibleSame wording as the Eyre & Spottiswoode version; same size type.
The spine leather was pared all over to about 0.6 mm with the head and tail parts pared evenly right down to a feather edge for twice the measurement of the turn-ins. This is to avoid an ugly step in the finished spine surface at head and tail and also to have mouldable leather for the headcaps.
I gave up using a spokeshave or either the Brockman or Scharfix paring machines some years ago. A Little Giant paring machine with a new razor blade does the job perfectly in less than half the time. They have not been made for decades, but you can still find them second hand on-lineThe parings are mainly thin strips with relatively few crumbs. Just what you want. The paring knife on the left is for the final feather-edging
Now, covering the spine: the spine has been previously covered with thin cotton or aero-linen and the spaces between the bands lined with strong paper which is sanded down to remove all unevenness. The bands have been raised a little with strips of leather so as to stand out well (see earlier posts of this Challenge).
The leather is damped on the hair side and pasted on the flesh side EXCEPT FOR ABOUT HALF OF BOTH THE TOP AND BOTTOM PANELS. It is stretched over the back and tied down with cord.
After ten minutes take the cords off and sharpen the bands with band nippers. Leave the book in the press for at least a couple of hours for the paste to dry.
The next stage is turning-in the leather at head and tail – this a ‘tight-back’ binding so there is no hollow to turn the leather into, which makes the operation more fiddly. But first, we noted in an earlier post on this project that the boards have a slant down from the top edge to the spine so that head bands are not as tall as the top and bottom edges of the oak boards, presumably to help protect them from knocks or rubbing when the book is in use. That means that unless packed out a little there will be an awkward step at the headcap. To avoid that I glued pieces of hemp cord on the inside of the spine leather so that when the headcap is made it is in line with the inner edges of the boards.
Now the turn-in leather is damped on the outside, pasted on the inside and paste is worked into the pocket behind the headband so that complete adhesion is achieved. The headcap is shaped in the usual way.
The blocked label is cut to size, edge-pared and glued (not pasted, as that can soften the leather and blur the lettering) in the second panel of the spine. I always sand the surface of the panel so as to ensure good adhesion.
There was some restrained decorative tooling on the original spine which I have replicated as closely as I can with the tools available- very Douglas Cockerell in style.
Remains of original spine on the right. Note that that leather was pigskin, not morocco, though the original braided clasps were morocco leather.
So, with endpapers of the same colour as the original, the job is finished.
A close match – the piece of original endpaper was quite flimsy, perhaps 90gsm. The new Hahnemuhle paper is 130gsm, about the same as the hand-made text paper.
The copy of the Essex House Press Prayer book of King Edward VII belonging to the Court Barn Museum in Chipping Campden has recently been returned and I was able to inspect it a couple of days ago. As stated in an earlier post (An Arts and Crafts Challenge) the damaged copy I had bought at auction lacked key parts of its braided leather clasps so a close inspection was necessary in order to carry out the repairs to my copy correctly.
My copy had the remains of eight-strand braided clasps
A blurred stock image of another copy showed D-rings at the ends of the leather braids but I needed to know the exact size and the material of the rings. On the off-chance that they would be the right size I bought a couple on-line and took them with me to Chipping Campden.
The copy there was in excellent condition, un-restored and therefore exactly what I needed to see.
Two things struck me – the braid is not eight-strand but six and the recess in which the strap rests is lined with leather, the same as the hook side. My copy was definitely not lined under the strap and certainly had eight strands.
I think the explanation is that each copy is by a different binder. The Court Barn copy has this binder’s stamp:
This is the Guild of Handicraft stamp confirming the binding is by Annie Power (strictly speaking ‘Anastasia Power’ also known as ‘Statia’). My copy had the stamp of Eyre and Spottiswood on the rear turn-in.
There are other small differences: the head caps of the Annie Power binding are tiny, being hardly turned over at all and the headbands are taller than those on my copy.
So that provides a little bibliographical information – the 400 copies are bound by different hands, though how many by each binder has to be the subject of further research.
In the meantime I can get on with making the braided clasp straps. I pared two strips of the same leather as will be used for the spine and threaded a D-ring on and pasted the two ends down, creating a double-sided strip about one-and-a-half times the measured length of the finished strap. That is necessary as braiding reduces the length by about a third. The pasted strip in cut into eight strands
Braiding eight strands is tedious. Each strap took half an hour, following a good guide from Youtube. A commercial bindery such as Eyre and Spottiswood’s must have regarded the client’s requirement for braided straps as unnecessarily costly. Perhaps further research will reveal how much they charged.
Anyway, the straps are now made and fixed in position. When positioning them through the slots in the oak cover it became clear why braided straps were used as the braiding makes them a bit elastic (stretchy) so when hooked over the iron plate on the back cover they actually pull the boards together. Of course, over a hundred years later the elasticity of the leather has gone and that is no doubt why the ones on my copy have failed.
Incidentally, the D-rings I bought speculatively online were an exact match!
Next instalment – covering the spine.
PS. The idea of braided clasps was most probably Annie Power’s as she had trained with Douglas Cockerell who described plaited thong clasps in his book ‘Bookbinding and the Care of Books’ published in 1901 (see pages 259-261). But the finely shaped recesses in the oak covers would have been designed in the woodworking shop of the Guild, by the cabinet-makers there.